
-
Rational service code 21
Posted by guest on May 16, 2019 at 12:00 amI have a mod.# SCC-62G that periodically shows a service code 21 and that it is in emergency mode. According to the code sheet this is a faulty micro switch for the clima control. The switch tests good. It also states that the humidity control could be faulty. Is this humidity control inside the pipe that the humidity control motor is attached to? What determines when that motor gets energized?
rationaltechnician replied 4 years, 10 months ago 1 Member · 7 Replies -
7 Replies
-

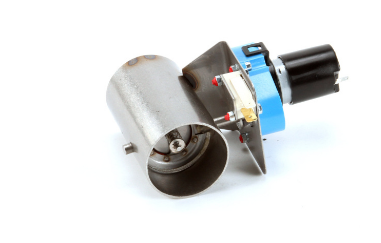
this is the humidity control;

-

I have a mod.# SCC-62G that periodically shows a service code 21 and that it is in emergency mode. According to the code sheet this is a faulty micro switch for the clima control. The switch tests good.
That switch merely tells the controller whether the flapper (inside the humidity control) is opened or closed. So, with the side panel removed, turn the oven on. The oven does a self-test of that humidity control. Make sure you’re seeing the motor running and the cam is changing the microswitch’s state.
It also states that the humidity control could be faulty. Is this humidity control inside the pipe that the humidity control motor is attached to? What determines when that motor gets energized?
The pressure control is mounted on a bracket at the upper right of the control compartment behind the side panel. Essentially, just behind the control panel.

That pressure control uses two sensing points. It senses air pressure through an air port at the periphery of the blower wheel through one flexible tube…and another air pressure port near the center of the the blower wheel through ANOTHER flexible tube.
Since humid air is less dense, the pressure difference between those two points would be greatest when the oven is at 0% humidity. Otherwise, the air pressure difference will be the least with 100% humidity.
The controller uses these two variables to determine everything in-between. So, if you set the oven for a specific humidity setting on the control panel, the computer will operate the motor to either open or close the flapper in the humidity control’s motor based upon the pressure control’s DC signal.
Just so you know: That motor only opens or closes FULLY. There’s no in-between with it.
FWIW: The humidity control is designed ONLY to let fresh, dry air in. Removal of humidity is accomplished through operation of a QUENCH valve, which supplies water to a special sprayer inside the quench box within the drain plumbing. A “cooling” spray of water within the drain’s quench box effectively creates a slight vacuum within the drain plumbing which, along with the fresh air coming in through the humidity control valve (the open flapper), draws steam into and down the drain. Dry air comes in through the humidity control valve to balance the cooking compartment pressure with atmospheric.
If you’re not seeing any issues with the humidity control’s operation, then I’d first check cleanliness of the oven’s cooking compartment. The aforementioned air pressure sensing ports can become clogged if the oven is ill-maintained. If that’s suspect, then there’s a “special” procedure for removing the blower wheel – which only takes a few minutes.
How to do that is another topic.
There’s also a voltage test you can perform on the pressure switch to figure out what it’s doing. I’d have to hit the books to recall that test and…I’m not going there right now.
-
scottm, Your getting into a area that requires a Rational trained tech. I personally would start with a complete cleaning and descale. These ovens are very touchy. Great when running right, but a small sensing problem, software problem, or flow problem can make you go crazy.
-

Thank You for responding. I was curious as to what controls the humidity motor as I was not getting the 12VDC at the motor on start-up. I’ll go back and check the pressure switch. Reading your previous posts on Rational equipment it appears you are quite knowledgeable on these. Thank you for your input.
-
It definitely has made me crazy.
-
Thanks. I try.
I’m not school trained on ’em but did some intense study of ’em. With twenty-eight Rationals on our property…and fourteen of ’em being some variation of the SCC-line of ovens, I just HAD to learn them out of necessity.
-

On models produced up to October 2011 (index E & G), Service 21 meant only that the cam on clima motor did not do a 360 degree rotation in the allowed 20 seconds. Possible it did not rotate at all.
Every time the door is opened and closed while the unit is on, it does a check (initialization of the Clima Valve and times it).
First step for a technician is to go into the technician level (from home screen, flip dip switch 1 to “on” on back of PCB).
Touch the tool box that appears on 4th screen middle of display.
Select Basic settings. Turn dial to step 1.2. On screen 3 you see “Flap” with a start button beside it. On 4th screen you see Dv(t0), Dv (t1) and F-t.
F-t is the rotation time during the last initialization of the humidity flap motor (clima valve). It should be around 19-21 seconds. If it is 0s, it did not turn or do a full rotation. If it is less than 19 seconds, running too slow, check for fat accumulation on valve and as a result between clima valve and hole behind motor fan wheel. This requires removal of fan wheel.
Press the start button on 3rd screen to force a new check.
If you don’t hear it, the clima motor is stuck, has failed or it is not getting the 12VDC from X11 display PCB.
Check the voltage supply to the motor unplugged (without load) during the above mentioned routine, you have 20 seconds. If you have 12VDC, check that wires are not switched and that you have good connections on motor and micro switch. Change the clima valve.
If no 12VDC, I’m sorry to say, you may need a new PCB. Internal components of the PCB are not delivering the 12VDC you need.
Risky test.
On those older models (Index E and G only) there was a battery reset you can try. You must be sure the Eprom is not corrupted because that has your model stored which the unit uses this to operate. You must already be familiar on handling of Service 17 and have the USB stick. If not, forget about this step.
Battery reset process: You must do this in this order. Unplug unit. Remove battery on PCB. Wait 2 minutes. Insert battery. Plug in unit. Wait 1 minute to allow unit background reboot. Switch on unit. If screen loads, you should hear the Clima Valve and Drain valve initialize. If you get Service 17, you never met me.
Log in to reply.